Autoscaling
With autoscaling, virtual machines in a destination pool are scaled automatically based on defined load and user parameters.
Autoscaling in oneclick™ is controlled exclusively via destination pools and is not available for individual destinations.
The cloud providers IONOS and Vultr do not support the autoscaling function.
Autoscaling automatically creates and removes virtual machines based on a defined base VM. Load distribution is handled via load balancing and takes into account the number of users, CPU utilization, and RAM usage. Optionally, alternative instance types can be used to ensure availability in the event of resource shortages.
All users must access the system via oneclick™ streaming so that they are correctly detected and considered by autoscaling.
If local user profiles are required in your environment, they can be implemented using Windows built-in tools such as FSLogix.
Before setting up autoscaling, ensure that:
- User licenses are enabled and users are created
- sufficient app licenses are available
- a cloud subscription is created or connected in oneclick™
Overview of the setup steps
- Prepare network and domain controller
- Create and prepare base VM/master VM
- Create the autoscaling event profile
- Create a destination pool and configure load balancing
- Enable autoscaling in the destination pool
1. Prepare network and optional domain controller
First, set up the network that will be used for the later virtual machines.
- Create a network .
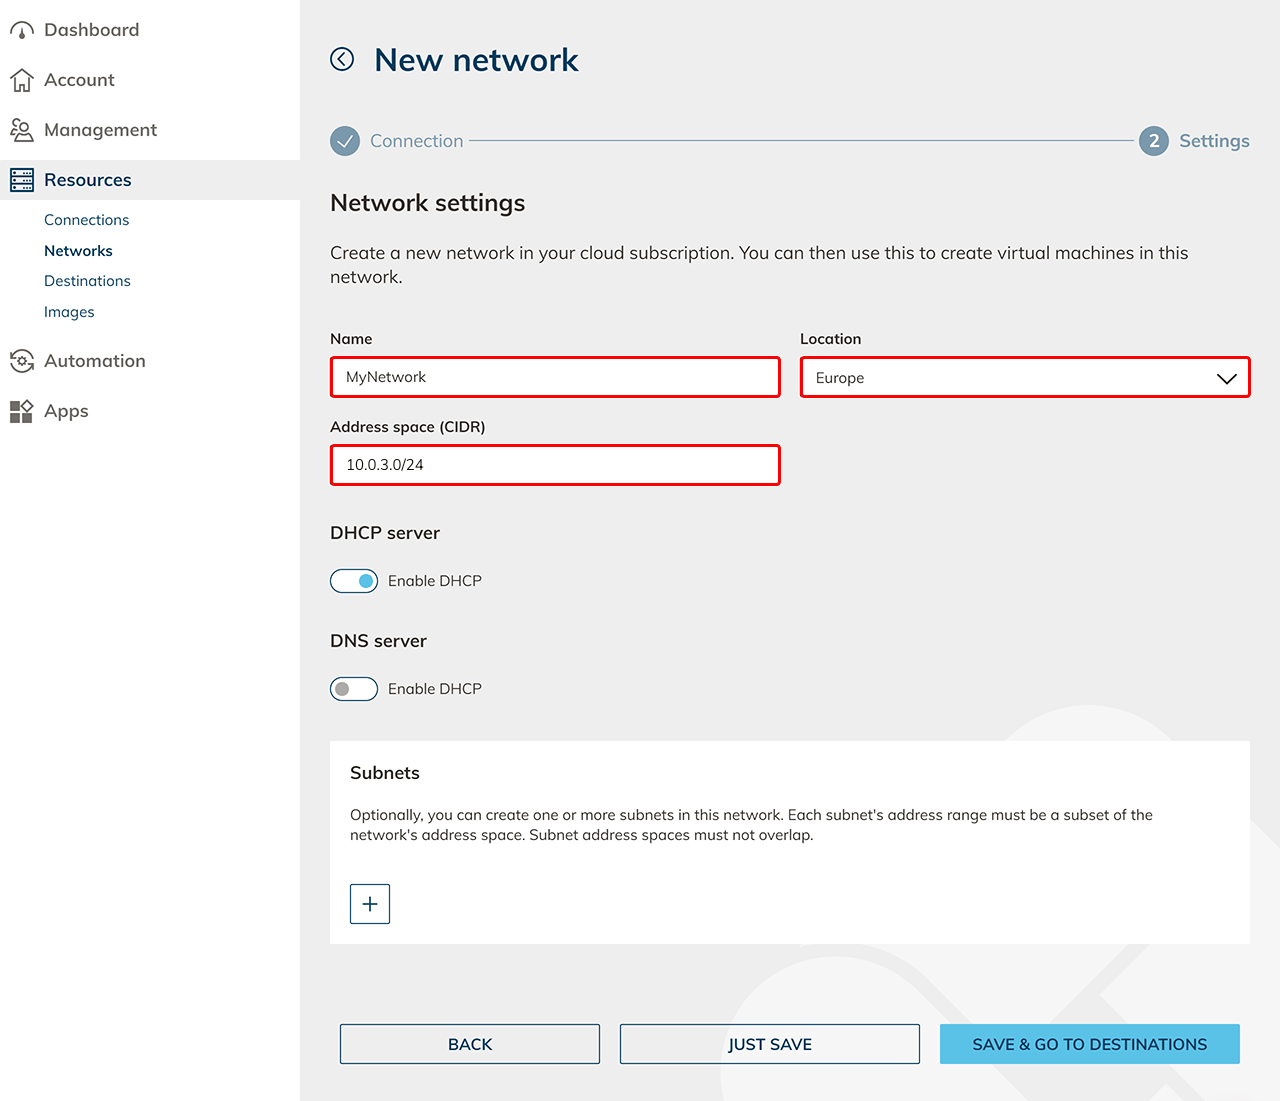
- Create a network security policy for the oneclick™ IP addresses.

Set up domain controller (optional)
If you use an Active Directory integration, also set up a domain controller.
If no AD integration is required, skip this section.
- Provision a VM .
- Create a destination pool .
- Create an app configuration .
- Create an app instance .
- Configure the VM as a domain controller.

After successfully setting up the domain controller:
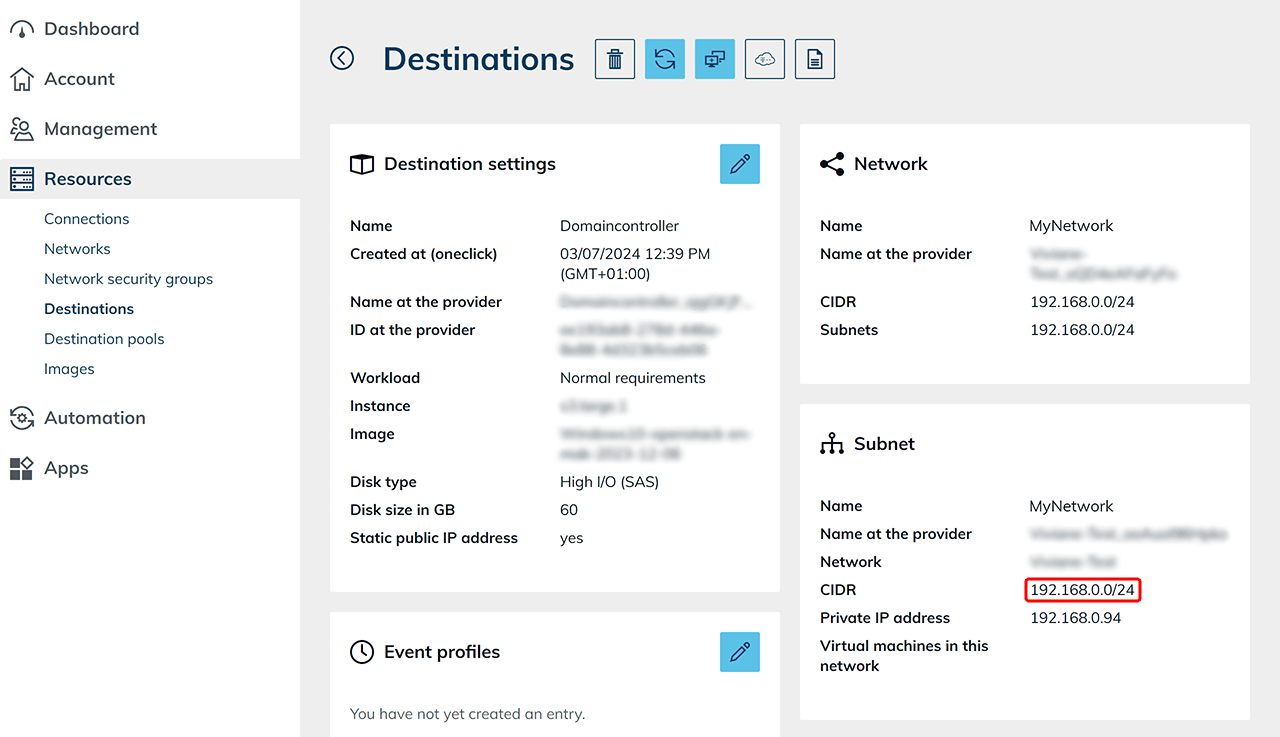
- Edit the existing network security policy and allow the internal network range so that virtual machines and the domain controller can reach each other.
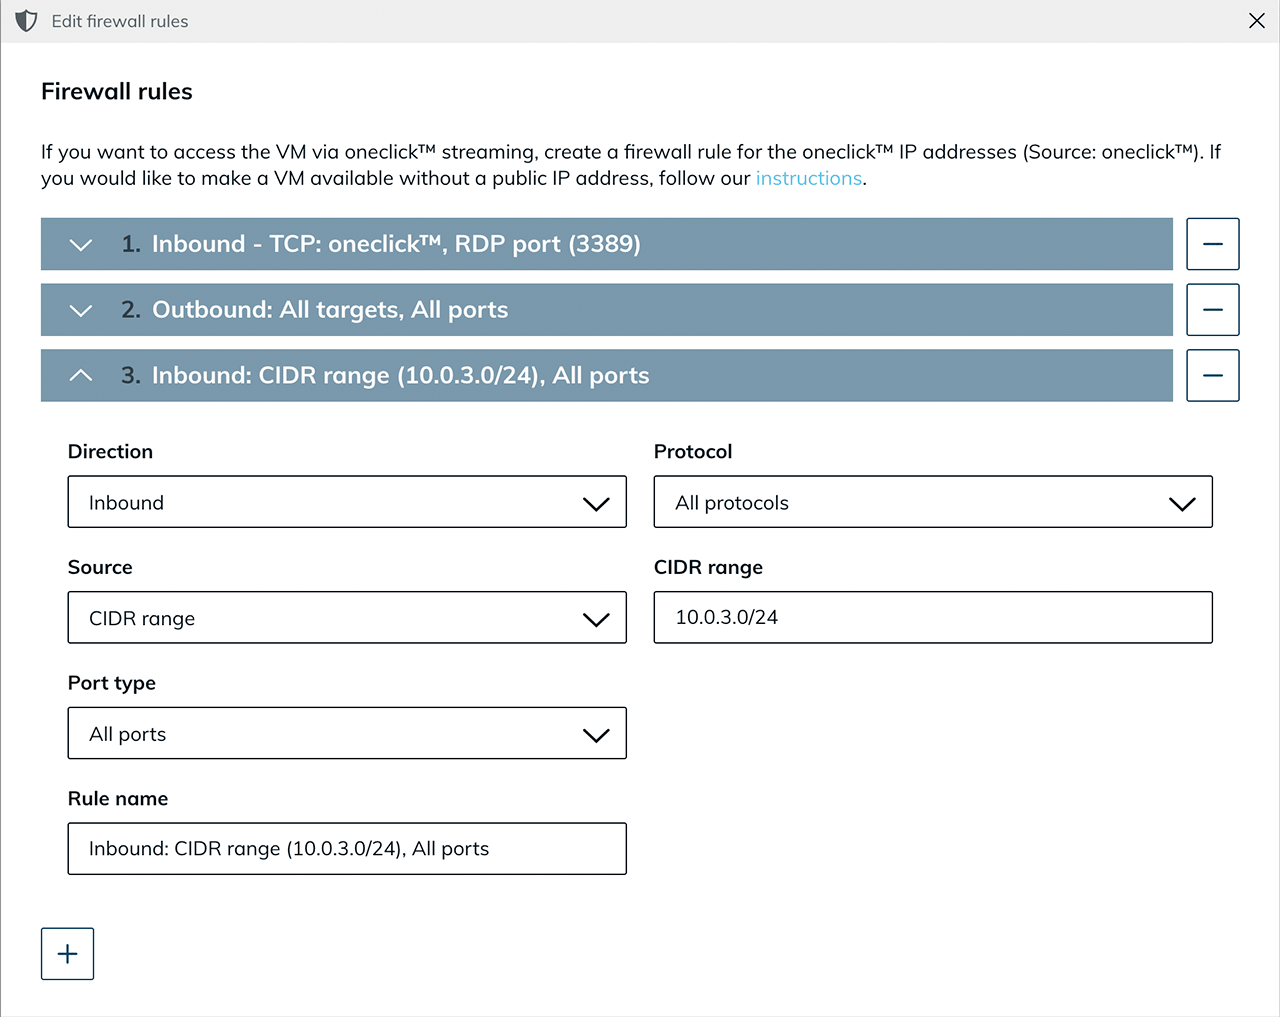
- You can find the CIDR range in the domain controller details view.
2. Create base VM for autoscaling
Autoscaling requires a base VM. This VM serves as a template for all clone systems that are created automatically later and is not used productively itself.
Public images provided by the cloud providers are updated regularly and therefore cannot be used as a base image for autoscaling. Create your own image instead.
- Create a preparation VM of a suitable size.
- Also create a destination pool as well as an app configuration and an app instance to configure and test the base VM. Productive use takes place exclusively via the automatically created clone systems.
- Set up the VM completely and then create an image.
- Create a new VM based on the created image. This VM serves as the base VM for autoscaling.
- Select the created image.
- For Windows clients, at least 4 CPU and 4 GB RAM are required.
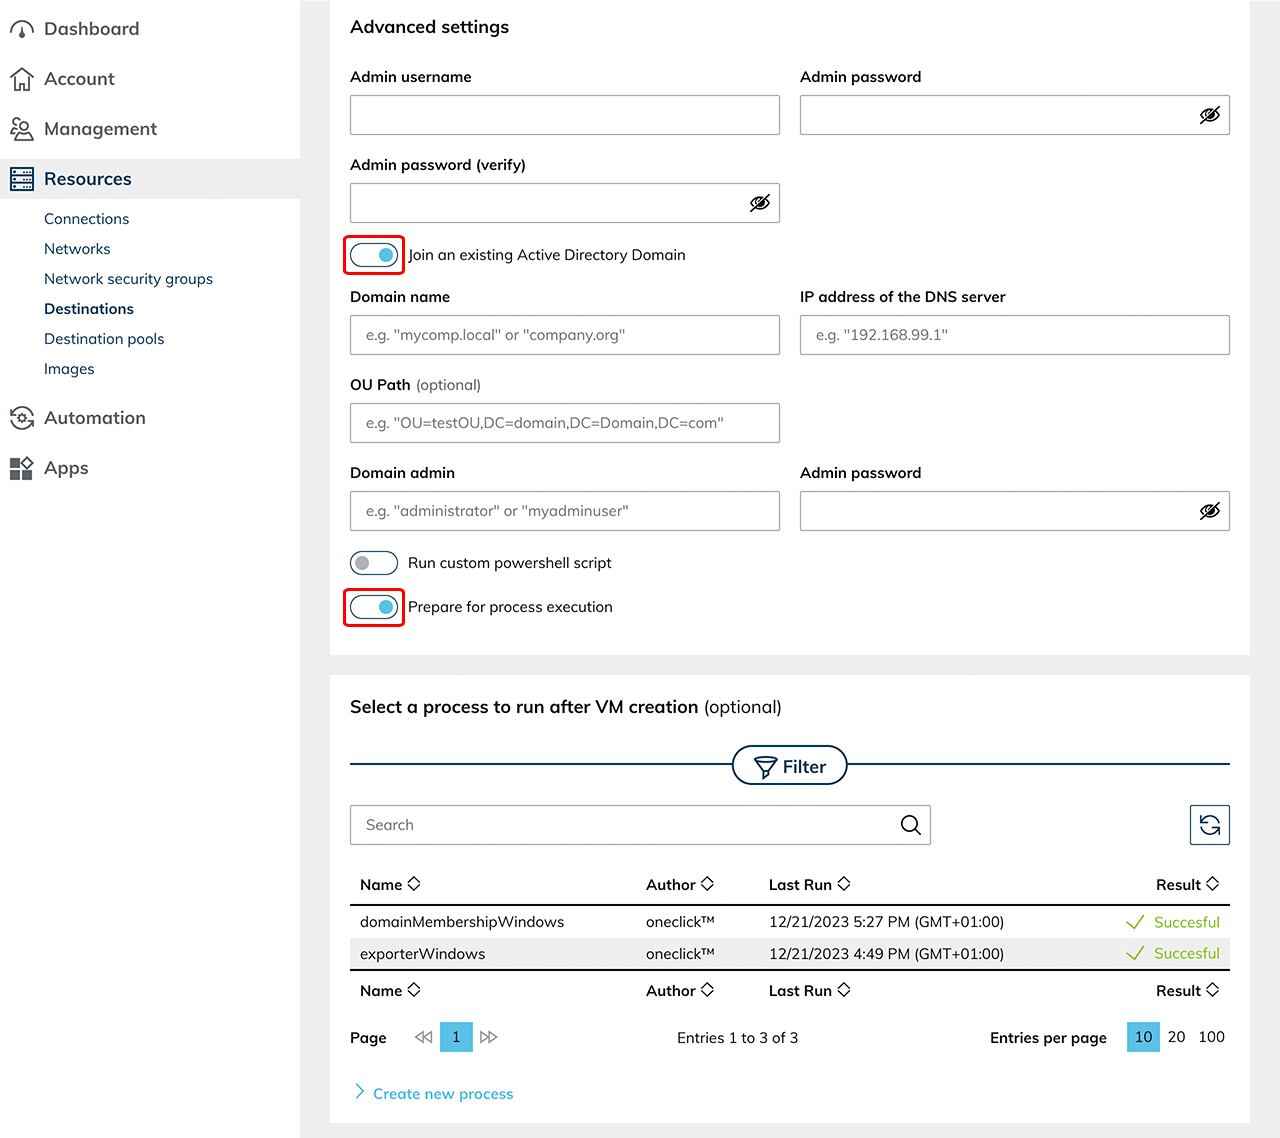
- Enable “Join an existing Active Directory Domain” if an AD integration is used, and enter the required domain details.
- Keep “Prepare for process execution” enabled.
- If an RDSH role is required, you can optionally store the process “Run custom PowerShell script” during creation.
Using an imported VM
If the base VM is imported from an existing cloud subscription, additional configuration steps are required. For more information, see the article “Autoscaling with read out base VM”.
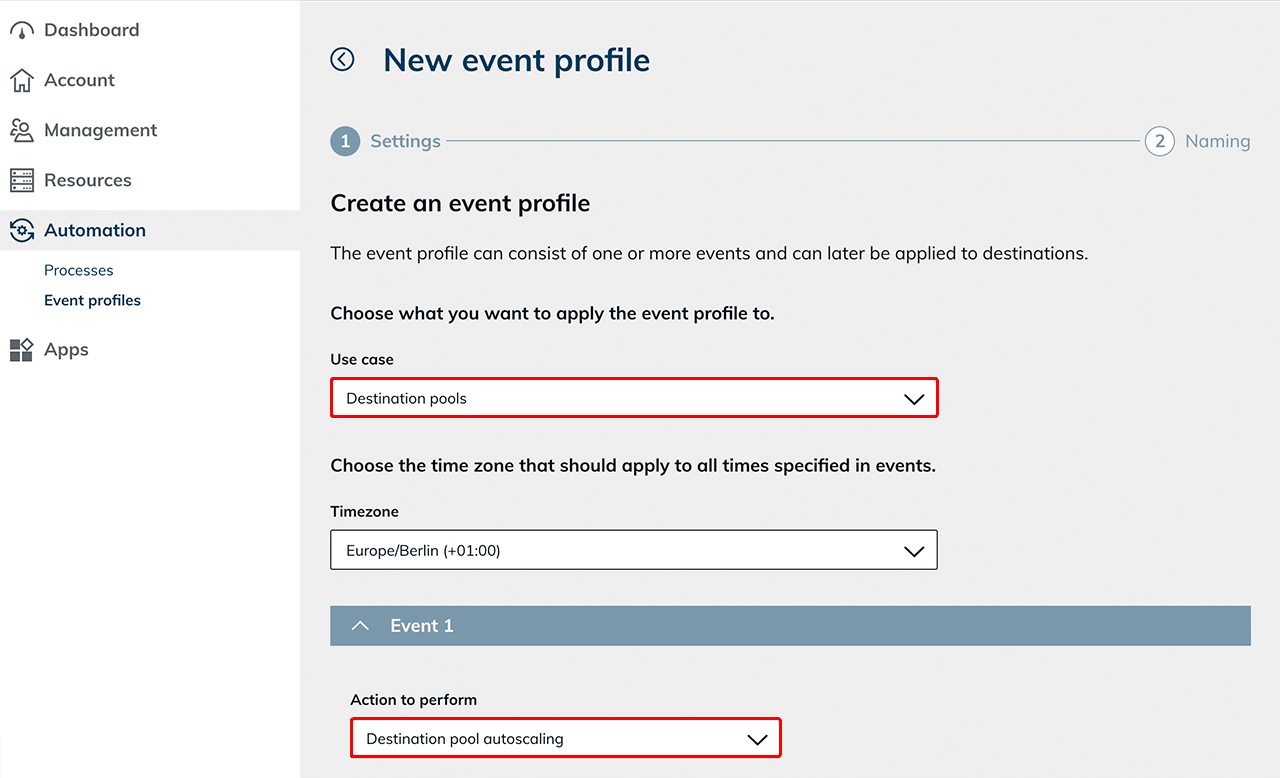
3. Create event profile for autoscaling
Create an event profile to define the scaling behavior of a destination pool.
- Create a new event profile.
- Select the use case “Destination pools” and the appropriate Timezone.
The autoscaling action is only available when selecting the use case “Destination pools”. - Select the action “Destination pool autoscaling”.
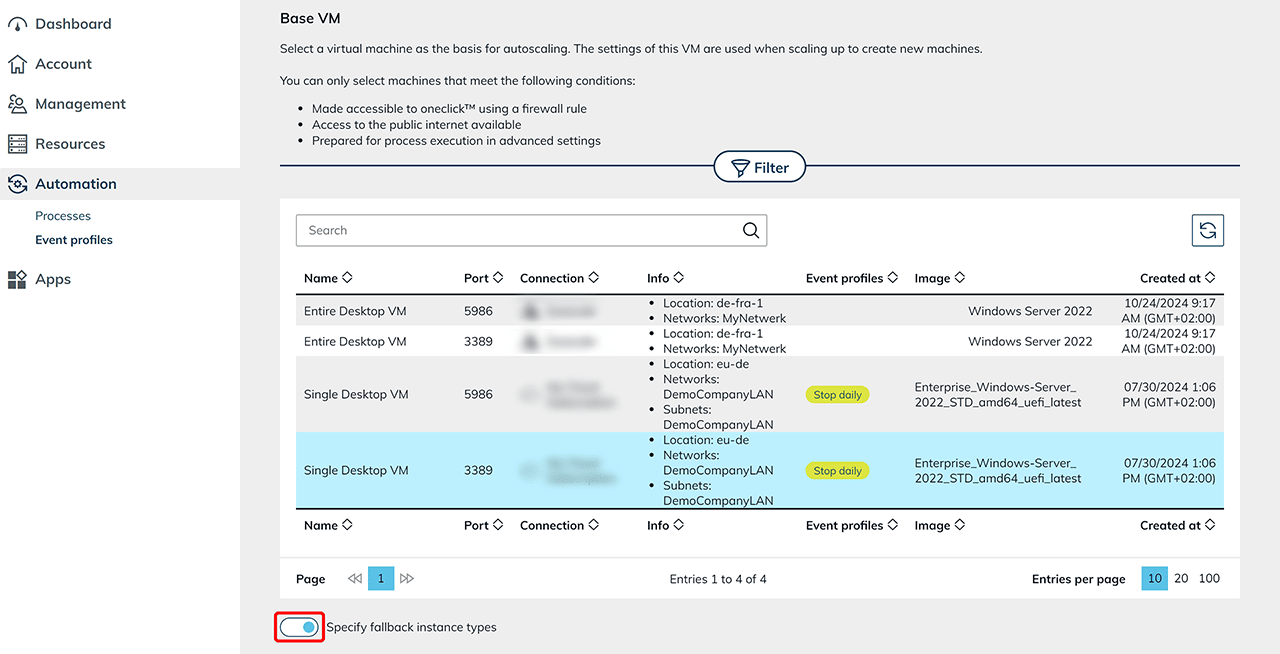
Select base VM
Select the base VM on which you want to run autoscaling. All virtual machines that will be created automatically in the future are clones of this base VM. Depending on the cloud provider, you can define alternative instance types. This ensures that automatically available instance types can be used in the event of resource shortages.
Fallback instance types
This function is available for the providers Open Telekom Cloud, Orange, and Huawei.
Enable the toggle to configure fallback instance types.
Fallback instance types are used if the default instance type defined in the base VM is not available in sufficient quantity.
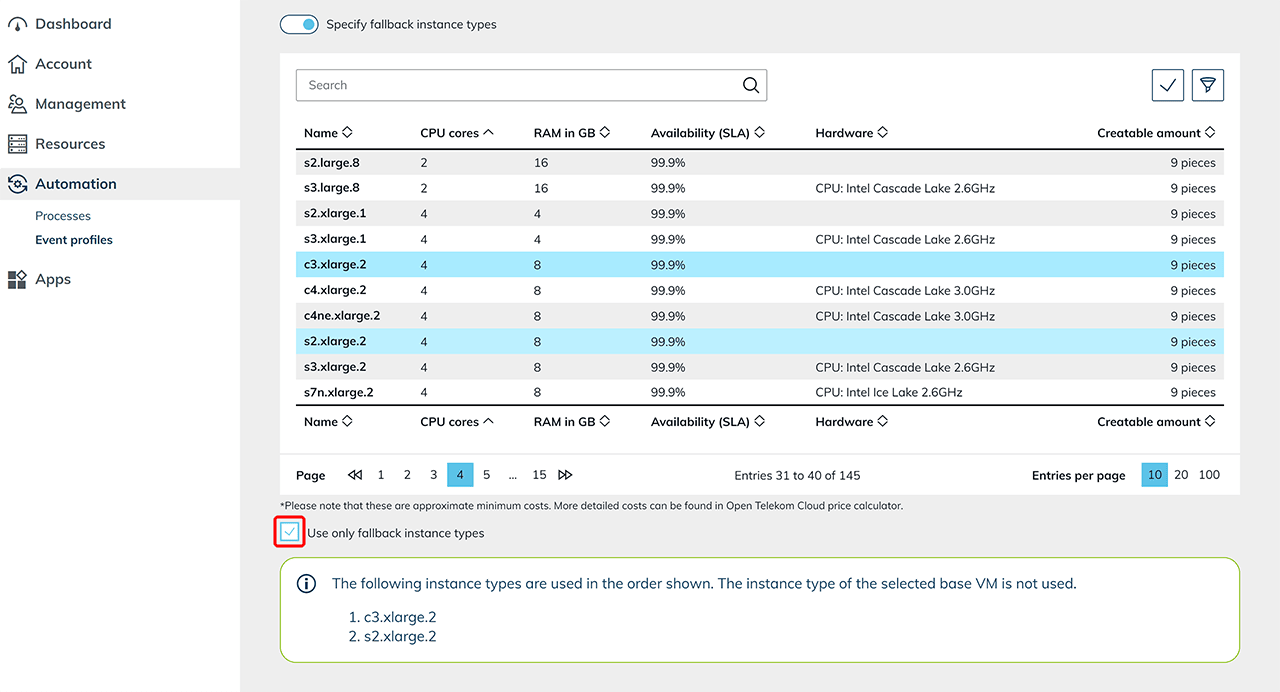
 Select the desired fallback instance types from the list of available options.
If you want to use only fallback instance types, enable the corresponding option. In this case, only the defined fallback instance types are used, even if the original instance type is available.
They are used in the order in which they are listed.
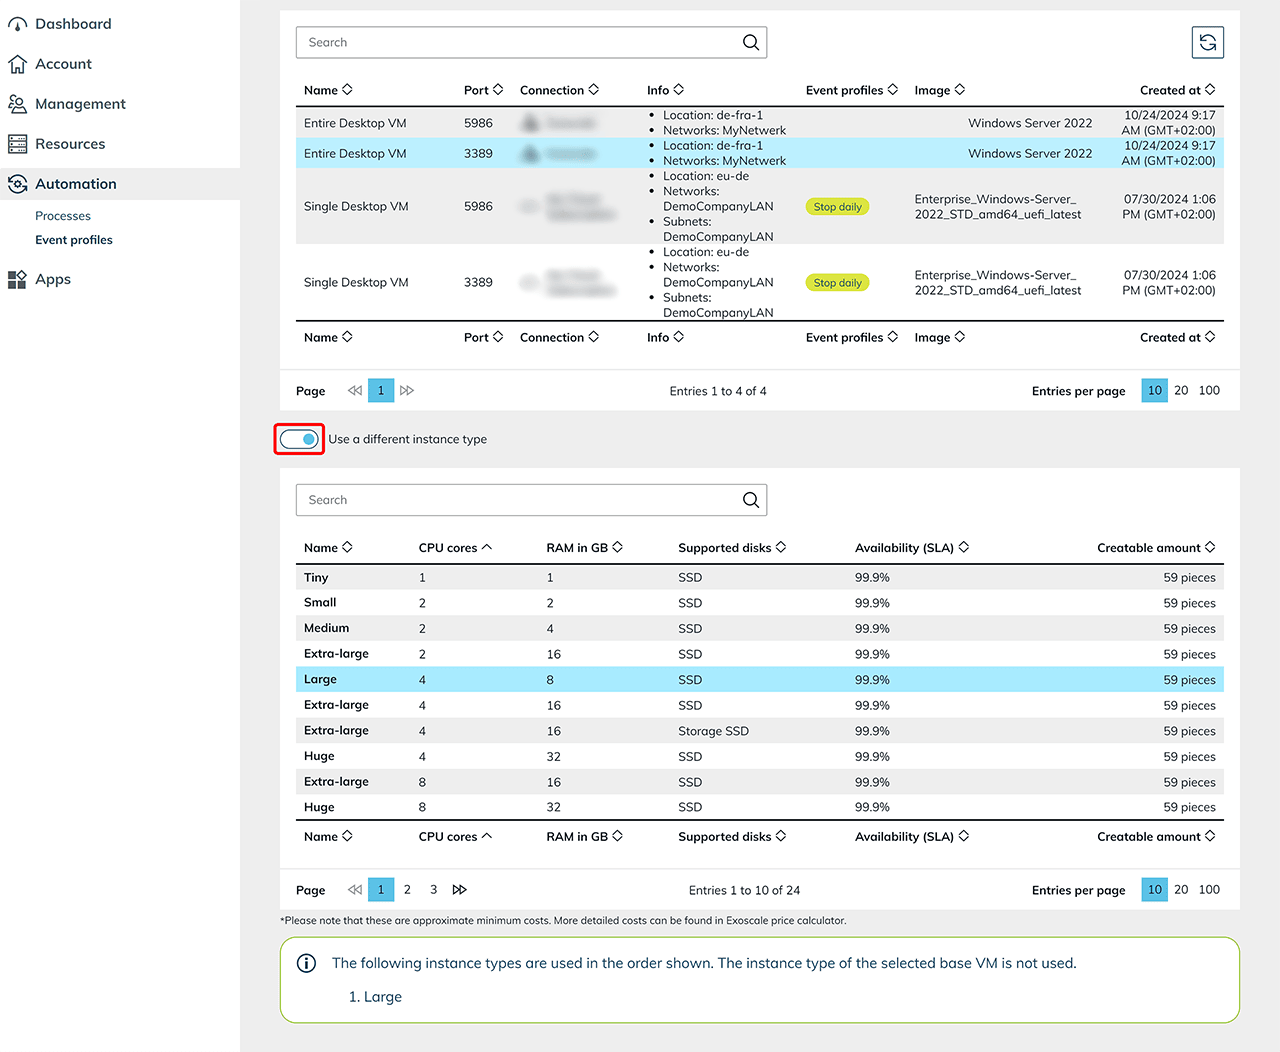
Different instance type
For other providers, you can define a different instance type that is used instead of the base VM instance type.
Enable the toggle and select a suitable alternative from the list of supported instance types.
Scaling behavior
Scaling timeout in minutes
This value defines the maximum duration of a scaling operation. If the operation is not successfully completed within this period (e.g., due to a failed domain join or an unreachable machine), the affected clone is discarded and the scaling operation is restarted. The value defined here applies globally to all scaling operations:
- Scale up
- Scale down
- Initialization of new clones
- and for enabled Force Scale Down
Select scaling type
Select the desired scaling type:
-
Single user
is suitable for compute-intensive applications with exclusive system usage (e.g., CAD applications). -
Multi user
is suitable for scenarios with multiple users per system.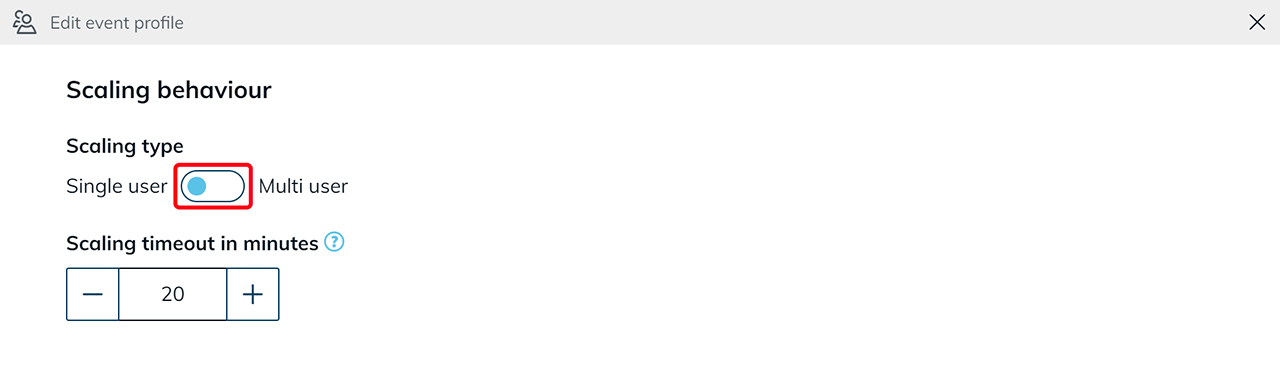
Single user
For single user, select the number of systems to keep available. Also note the information on scaling up and down in the oneclick™ admin.
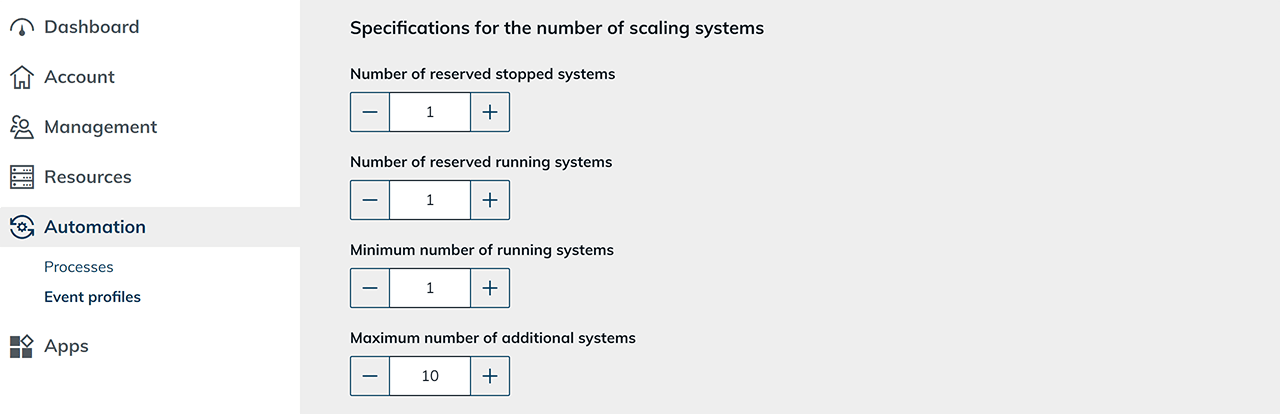
Define number of systems to keep available:
- Number of reserved stopped systems
Here you define how many prepared systems are kept in a stopped state. If one of these systems is in use, oneclick™ automatically creates a new clone and keeps it stopped to restore the number you configured. - Number of reserved running systems
Here you define how many already running systems are permanently kept available. Running systems allow particularly fast access to the user interface and are always ready for use. As soon as one of these systems is in use, oneclick™ automatically creates another clone to restore the defined number. It is recommended to keep at least one system permanently running to avoid login delays. For multiple users, adjust the number accordingly to reduce waiting times. - Minimum number of running systems
Here you define the minimum number of actively running systems that must not be undercut. This ensures that a defined number of active systems remains available at all times. - Maximum number of additional systems
Here you define the maximum number of additional systems. This limit enables careful use of resources and financial means.
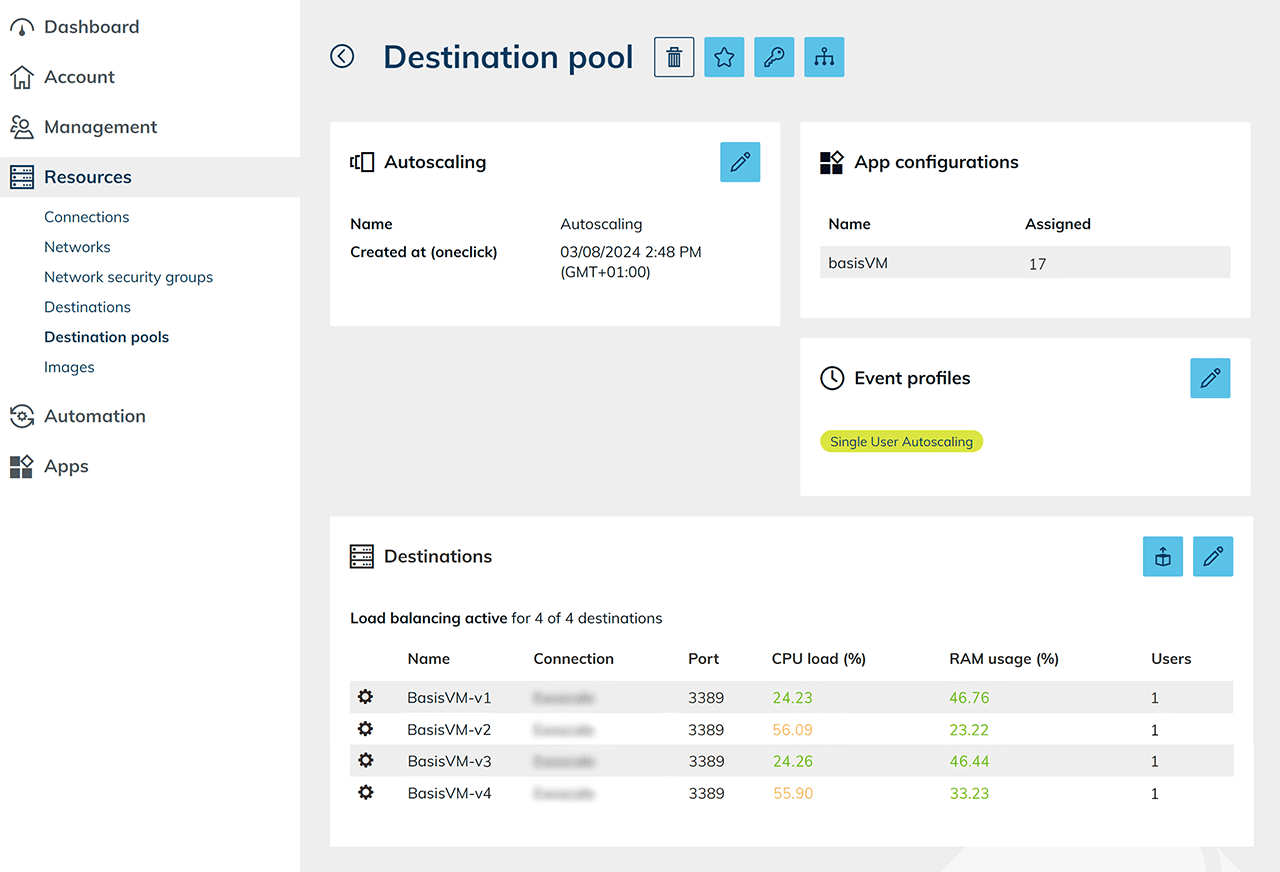
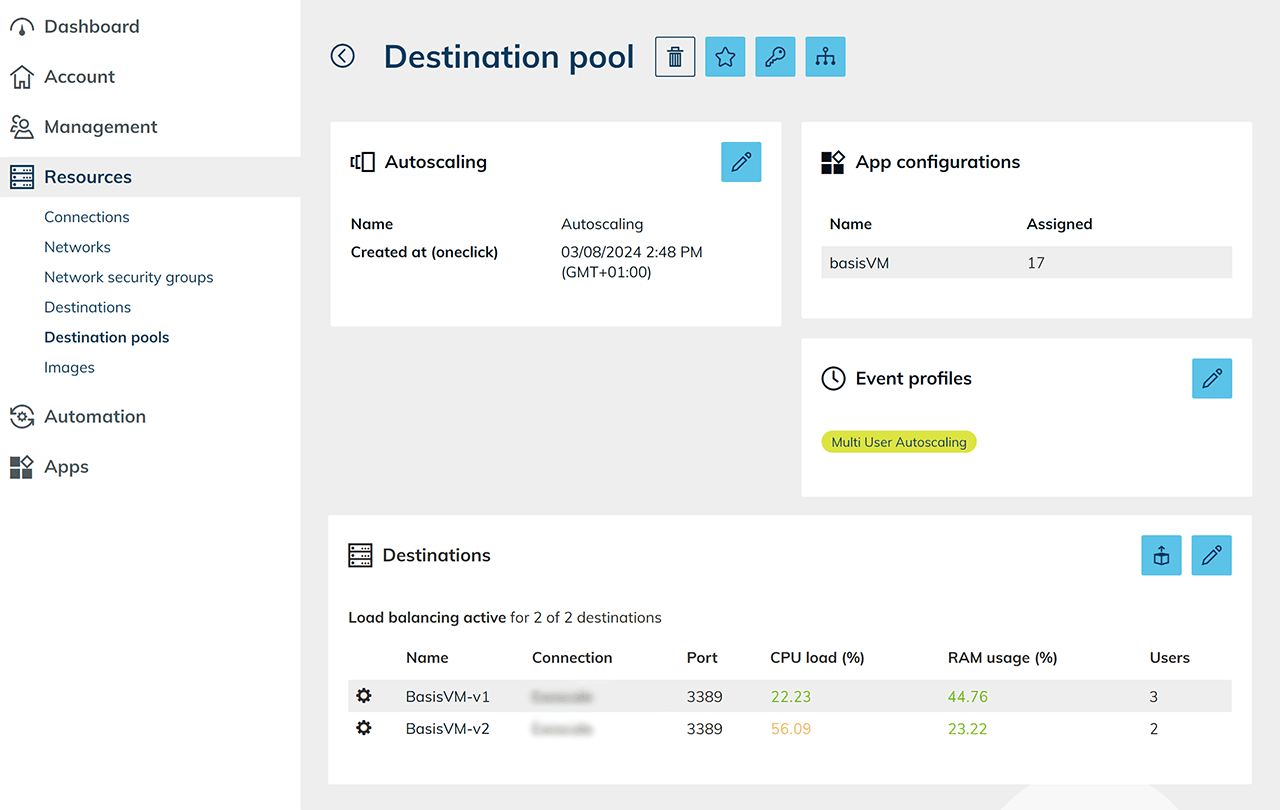
 The configured load distribution (load balancing) and the assigned event profiles are displayed in the details view of the respective destination pool.
 Then define the execution interval.
Multi user
For multi user, adjust the scaling parameters according to your use case. Note the information on scaling up and down in the oneclick™ admin.
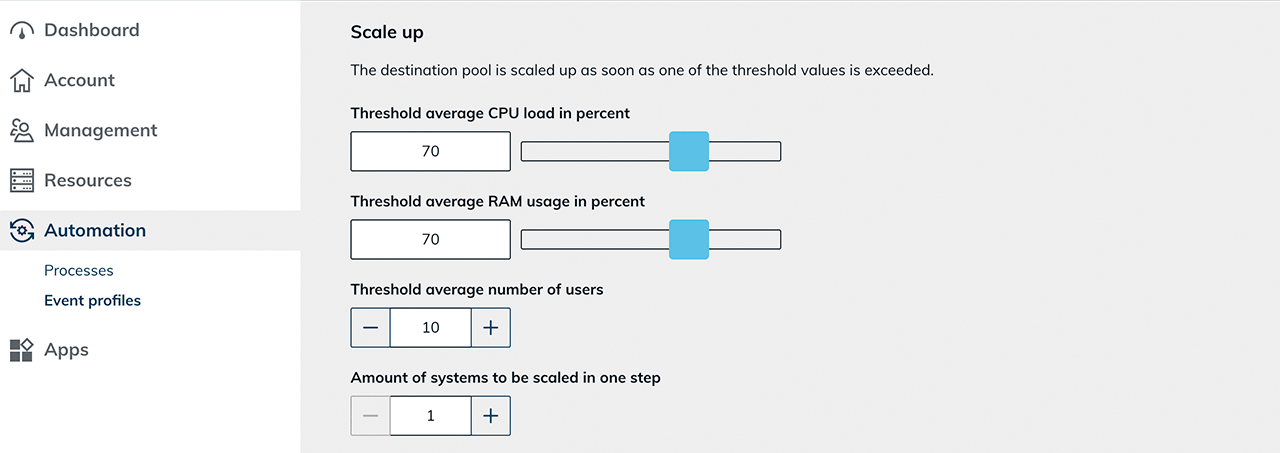
Configure scale up
- Define the threshold for the average CPU load.
- Define the threshold for the average RAM usage. These values are based on the load balancing settings defined in the destination pool.
- Define a threshold for the average number of users. If this value is exceeded across all servers, the system creates additional VMs.
- Define the number of systems that should be scaled in one step. For example, if the value is “1”, exactly one VM is created before the system responds to the new conditions.
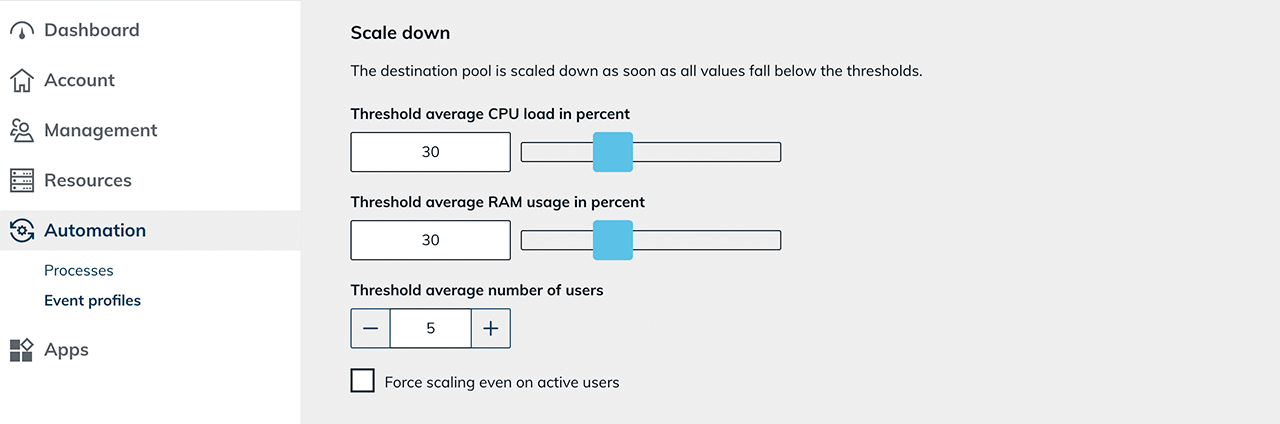
Configure scale down
- Define the threshold for average CPU load.
- Define the threshold for average RAM usage.
- Define a threshold for the average number of users.
If the defined threshold is undercut, the system reduces the number of active VMs.
Force Scale Down (force scaling down even for active users)
If “Force scaling even on active users” is enabled, scaling down also occurs even if users are still logged in.
The waiting time until scaling down is defined via “Scaling timeout in minutes”. At the start of this period, active users receive a warning message with the remaining time.

Technical effect:
- Active user sessions are ended.
- Unsaved work is lost.
- The affected systems are reduced according to the configured scale-down rules.
Suitable use cases:
- Planned maintenance windows
- Emergency measures
- Enforcing an immediate system reduction
Define number of systems to keep available
- Number of reserved stopped systems
Here you define how many prepared systems are kept in a stopped state. If one of these systems is in use, oneclick™ automatically creates a new clone and keeps it stopped to restore the number you configured. - Number of reserved running systems
Here you define the minimum number of actively running systems that must not be undercut. This ensures that a defined number of active systems remains available at all times. - Maximum number of additional systems
Here you define the maximum number of additional systems. This limit enables careful use of resources and financial means.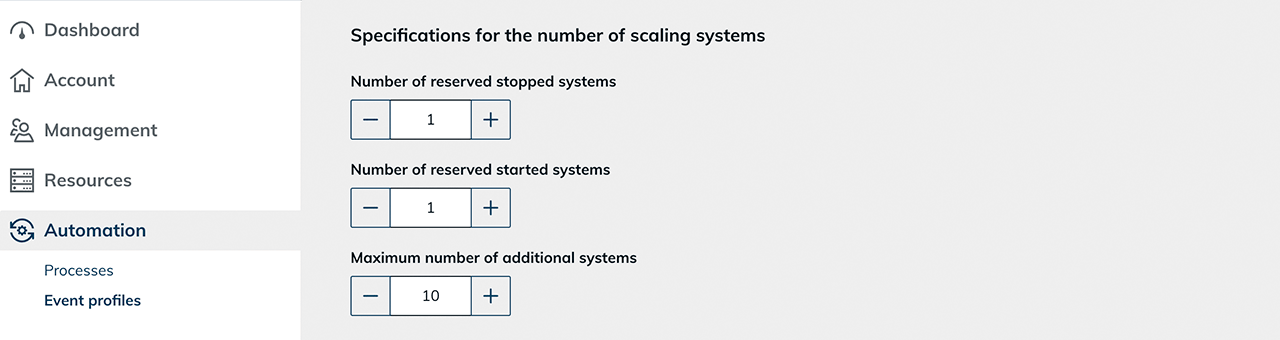 In the details view of the destination pool, the configured load distribution, the current utilization values (CPU, RAM, number of users), and the assigned event profile are displayed.
 Then define the execution interval.
Define execution interval
Under “Define an execution interval”, finally define a start time at which the settings are applied.
- For example, if you want your settings to apply from Monday to Friday, select Monday in the calendar menu, set the desired start time, and tick “Monday”.
- Click the Plus icon to create another event.
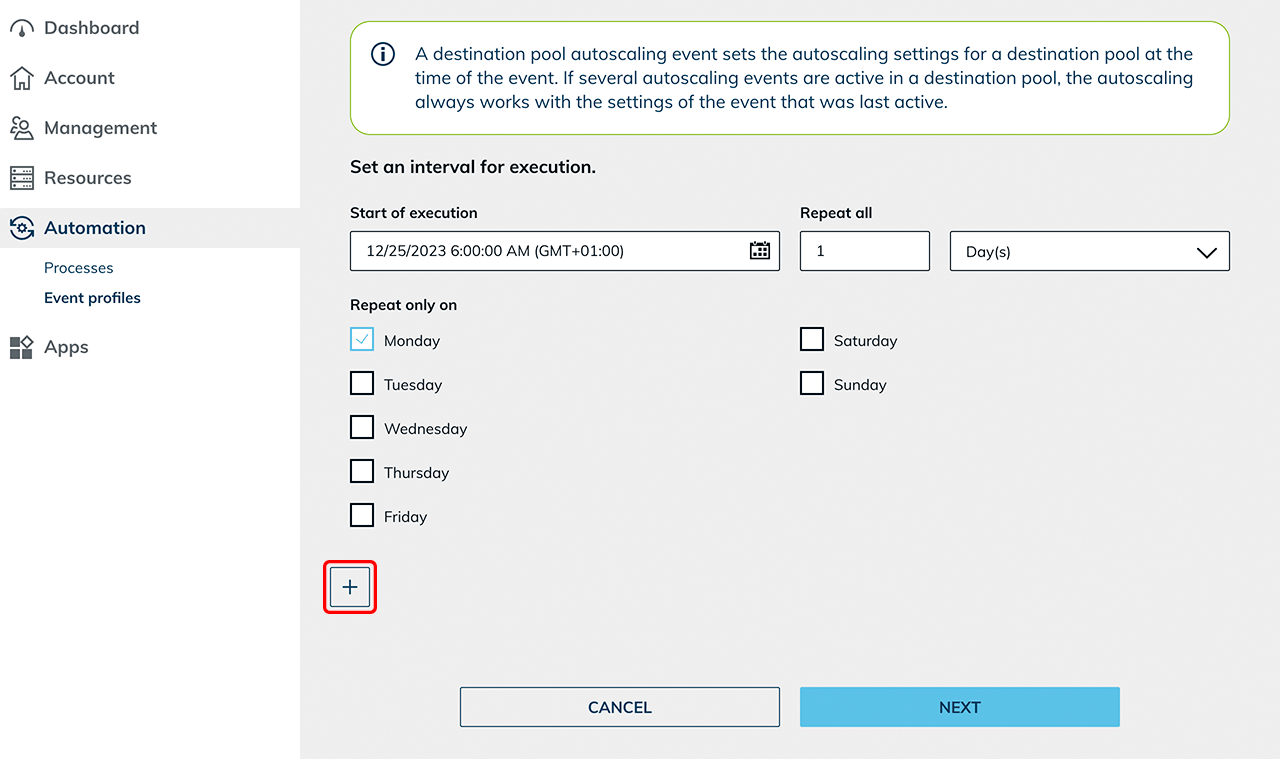
- Now configure the settings for the weekend and select Friday as the start time in the calendar menu, as well as a time in the evening from which the weekend settings should apply.
- Also select Friday as the weekday in the list below. At this point, the event overrides the previously valid settings until the Monday event applies again.
Determine a suitable profile based on the actual usage times. Test the selected settings with a limited number of users before using the configuration productively.
4. Create destination pool and configure load balancing
Create a destination pool and configure load balancing according to the scaling type you selected.
Create destination pool
- Create a new destination pool .
- Do not select a specific destination.
- Enable load balancing for this pool.
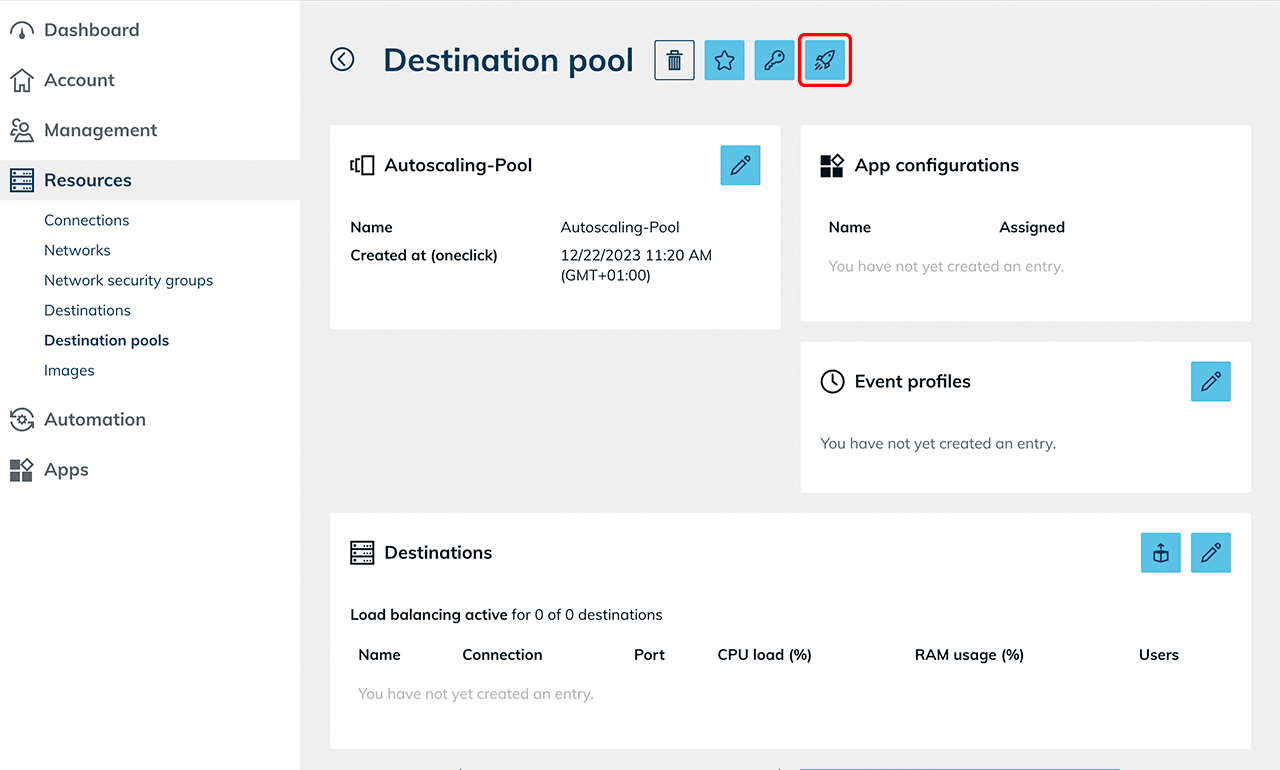
- Since the VM was created via oneclick™ and prepared for process execution, no additional measures are required to prepare load balancing. The required network settings were already set as part of the process preparation and the selected network security group.
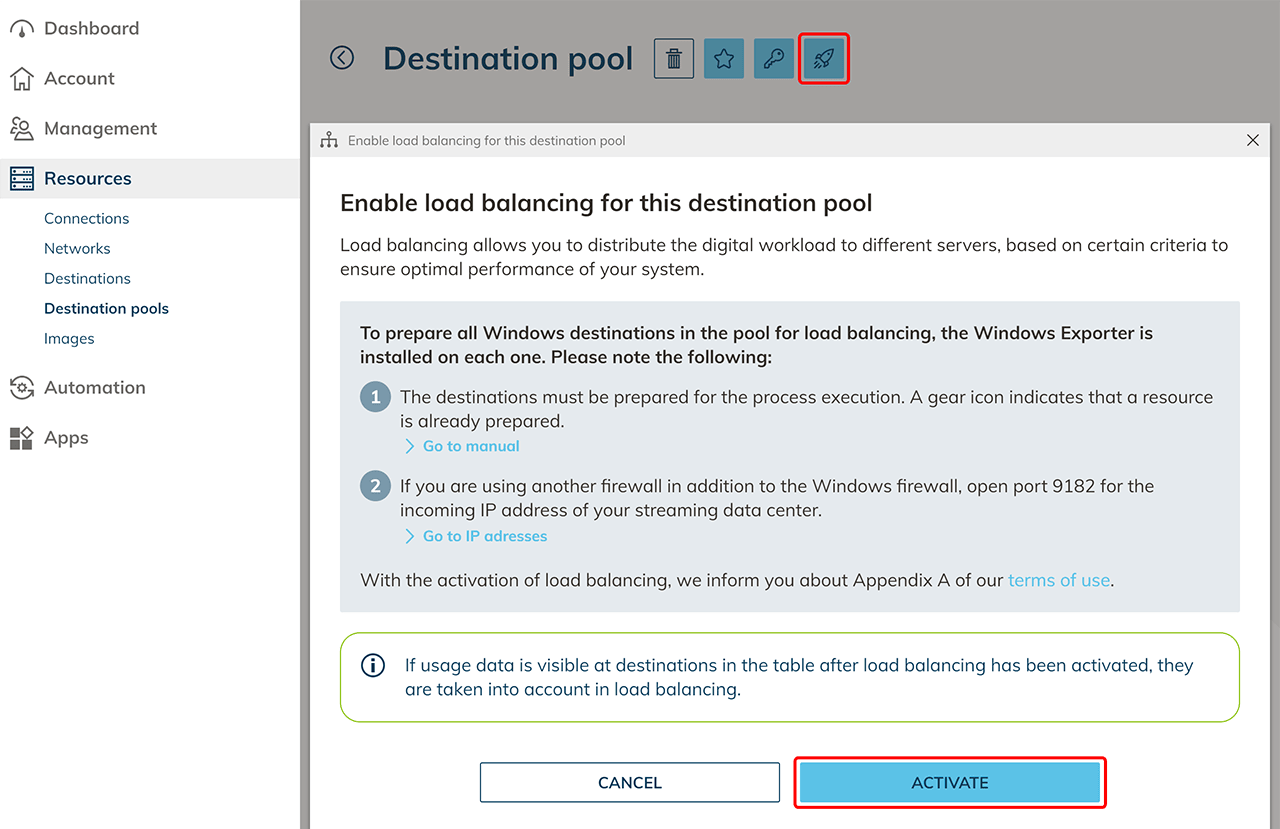
- After activating load balancing, the function of the button changes. You can then configure the parameters for load distribution settings, such as how load balancing should take place.
Configure load balancing
Click the Distribution icon to define the weighting and distribution logic. The configuration differs depending on the selected scaling type.
Single user
For “single user” scenarios, exactly one user is allowed per destination.
- Set the weighting factors for CPU and Memory to 0.
These parameters are not relevant for exclusive system usage. - Set the weighting factor for “Logged in users” to 10.
- Enable “User limit per destination”.
- Set “Maximum number of users” to 1.
- The option “Reuse existing user sessions” has no effect in practice for “single user”, since only one user is allowed per system.

Multi user
For “multi user” scenarios, multiple users are allowed per destination. Load balancing assigns new users to a suitable destination based on defined criteria. For multi user, define how strongly individual criteria (CPU, RAM, number of users) are weighted when assigning new users. For CPU utilization and memory usage, define:
- the "Time in seconds to calculate the data mean"
This period determines over which time period the measured values are averaged. Short periods respond faster to load peaks, longer periods ensure more stable, less fluctuating decisions. - the "Weight factor"
The weighting factor defines the priority with which the respective criterion is considered when distributing new users.
In addition, you can define a weighting factor for the number of logged-in users. This controls how strongly the current number of users flows into the calculation compared to CPU and RAM utilization.
The weighting factor can be defined on a scale from 0 to 10:
- 0 means that the criterion is not considered.
- 10 means maximum priority in decision-making.
If multiple criteria have the same weighting value, they are considered with equal priority.
Optional settings:
- “Limit users per destination”
Enable this option and enter the maximum number of users. This defines a fixed upper limit for the number of users logged in simultaneously per virtual machine. - “Sticky user sessions”
Enable this option if users should be assigned to the same destination when logging in again. Note the information on using sticky sessions.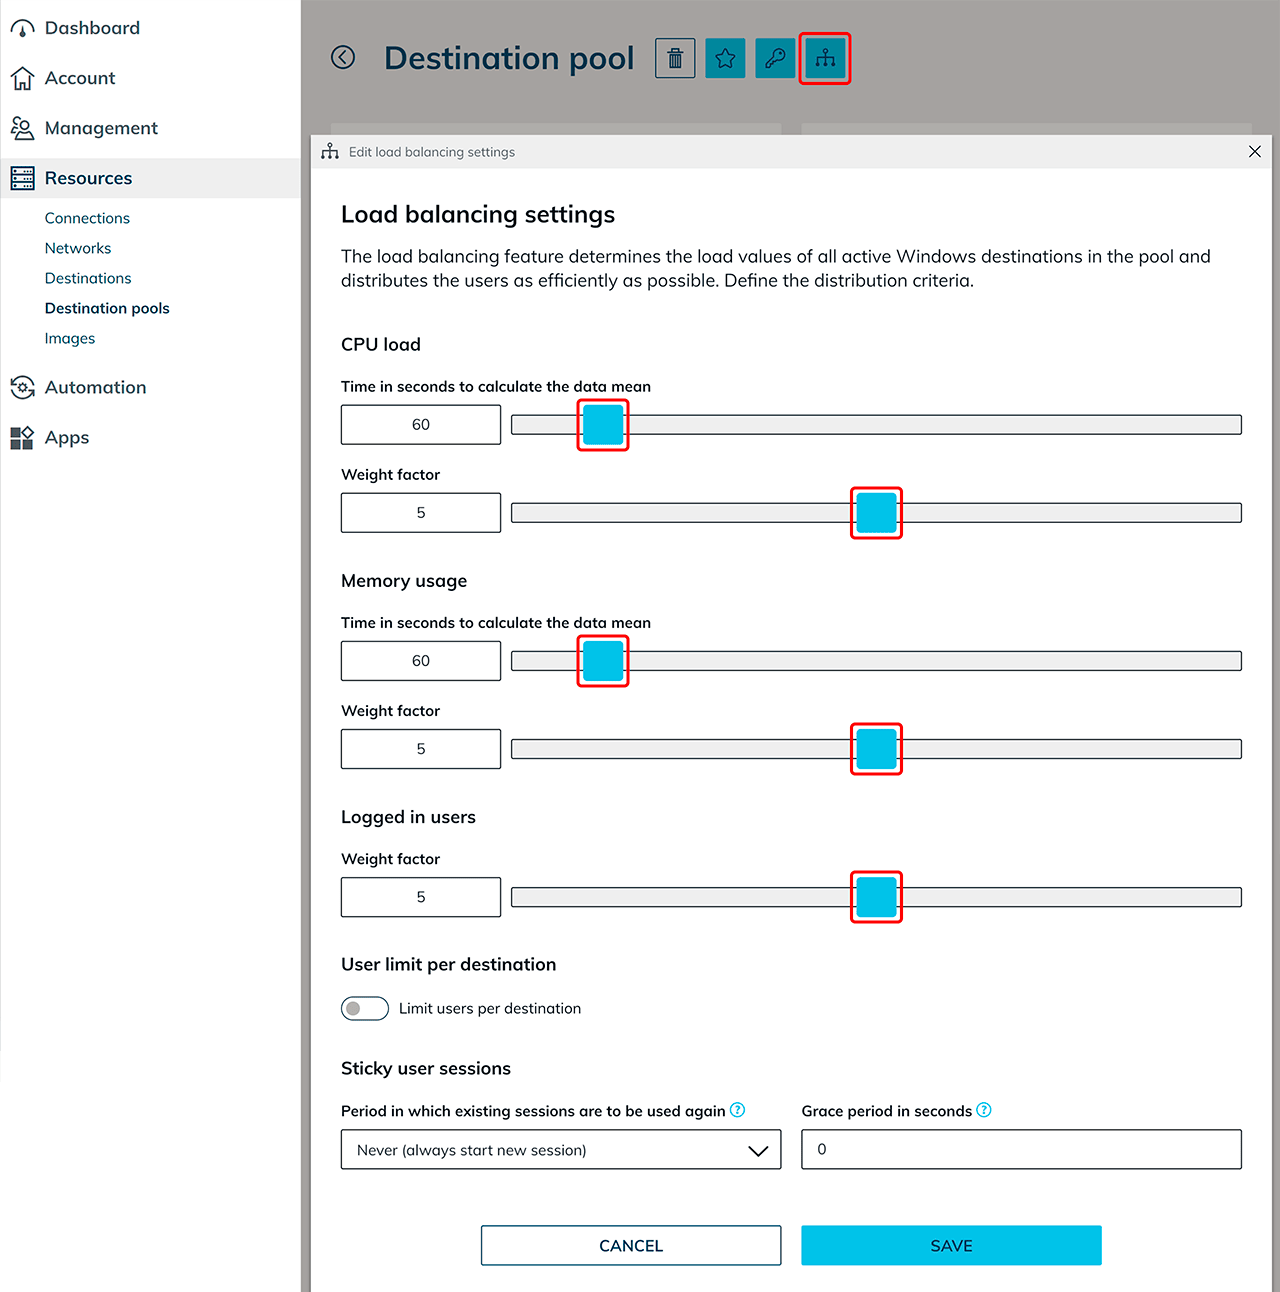
Configure user and app assignment
After setting up the pool:
- Create user accounts for all intended users on the domain controller (if an AD integration is used).
- Create an app configuration for the destination pool.
- Create app instances based on this configuration.
Select as destination: “Best destination of the load balancing pool” and enter the corresponding user login credentials.

5. Start autoscaling
Assign autoscaling event profile
The autoscaling function is available exclusively in event profiles for destination pools.
- Open the menu item Resources and select Destination pools.
- Click the List icon to open the details view.
- Click the Pencil icon in the Event profiles tile.
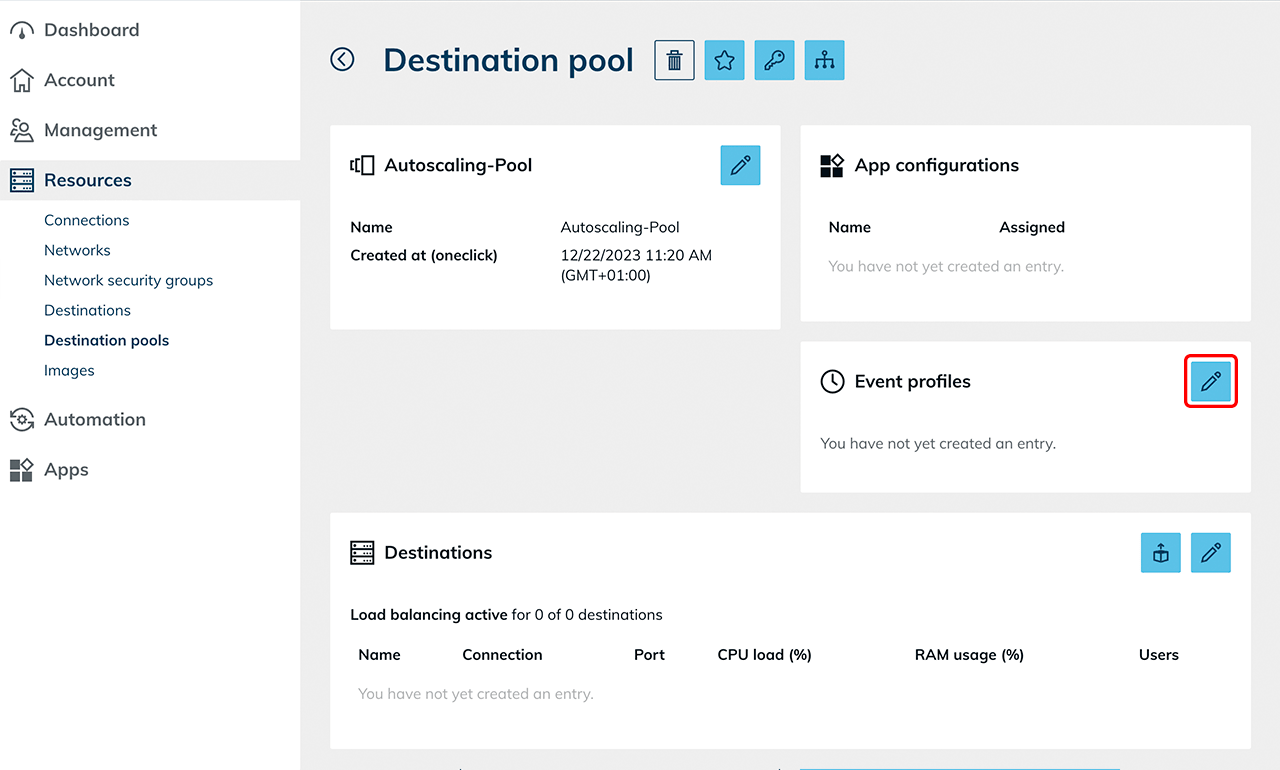
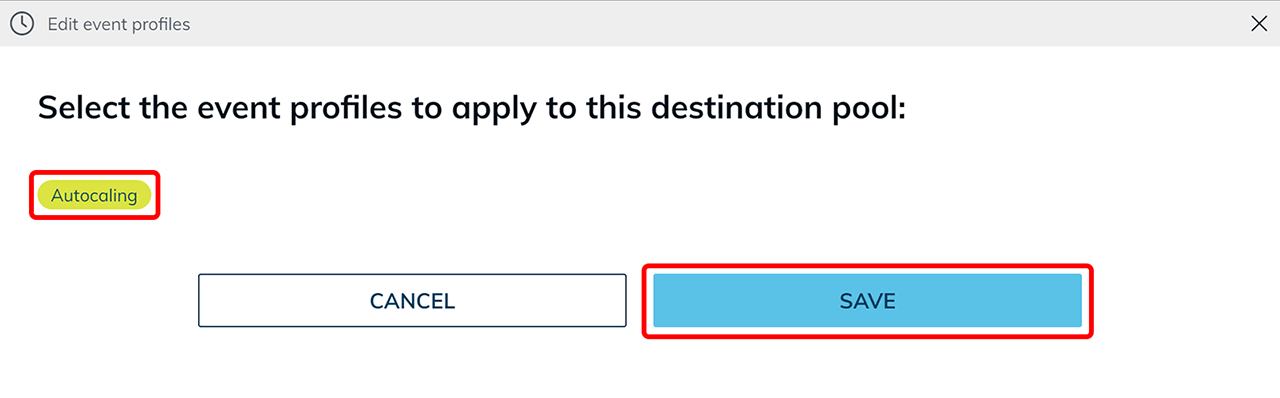
- Select the autoscaling eventprofile you created earlier.
If multiple autoscaling event profiles are configured, the last activated event always applies for the destination pool. - Save the selection.
What technically happens after activation
After saving, autoscaling starts automatically.
Initial system creation
- Depending on your configuration, the defined clone VMs are created first.
Example: If it is configured that one stopped and one running VM should be kept available, the system creates two clones of the base VM. - On both VMs, the system attempts to install the WinRM role to read the Windows metrics (CPU, RAM, users).
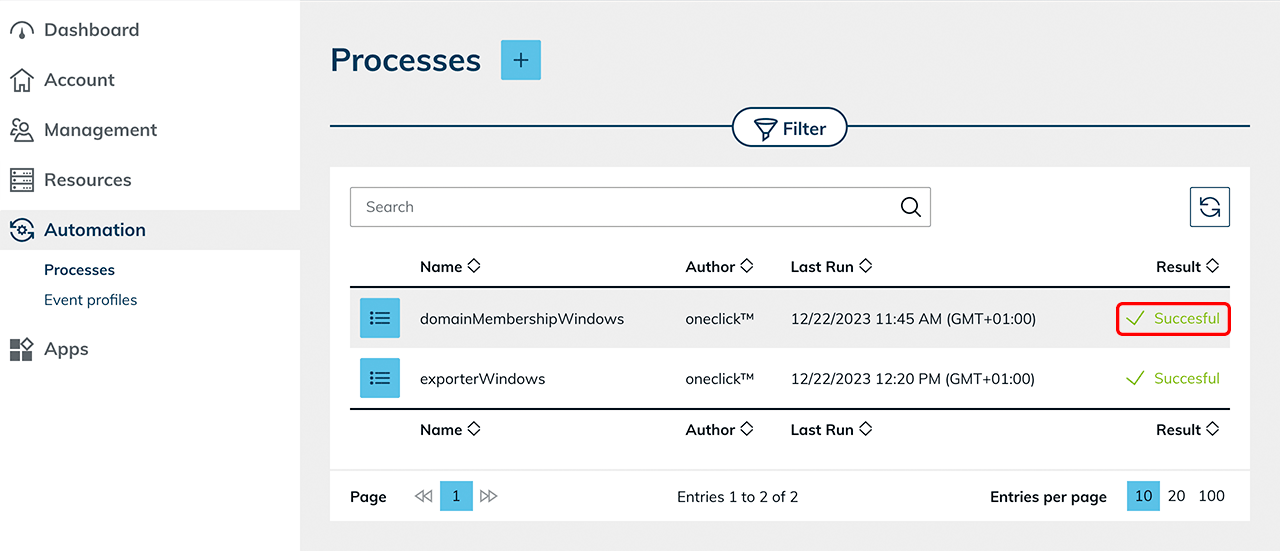
Check in the Processes menu whether the process ran successfully or whether the role was installed successfully. Depending on the system requirements, this process may be triggered multiple times if the VM is not yet responding.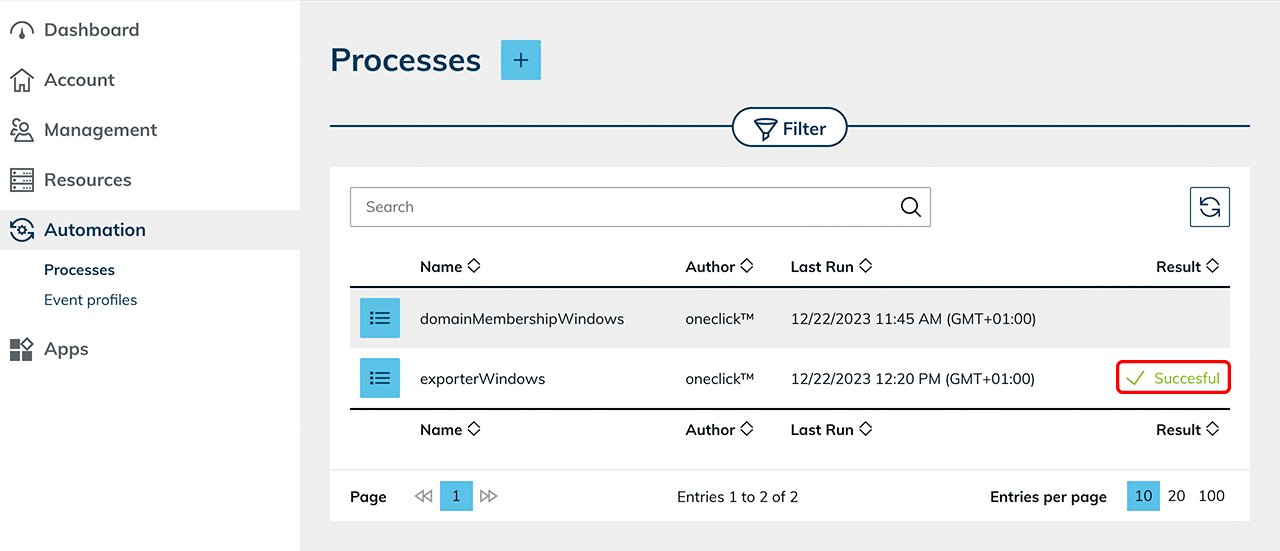
State after initialization
As soon as the WinRM component has been successfully installed, one VM is moved to the stopped state according to the configuration, if a stopped VM should be kept available.

The other VM remains active and is available for immediate user login without waiting time.

Scale up
If a user logs in or defined thresholds are exceeded (e.g., CPU load, RAM usage, or number of users), autoscaling responds according to the configured rules.
- The system automatically creates additional clone VMs based on the defined base VM.
- The goal is to restore the configured initial state.
- Depending on the setting, additional stopped and/or already started systems are kept available.
Example: If it is configured that one stopped and one running VM should be kept available, after a user logs in the system automatically creates a new clone so that in addition to the occupied VM there is again a free running VM and a stopped reserve VM available. In this way, autoscaling ensures that new users can work without delay and that sufficient capacity remains available for further logins.
Scale down
If a user logs out again or the defined thresholds (e.g., average number of users, CPU or RAM utilization) are undercut, the system scales down according to the configured settings.
- The system selects a VM that should be reduced.
- On this VM, the process “domainMembershipWindows” is executed. The VM leaves the Active Directory domain.
- The virtual machine is then removed.
This approach releases resources that are no longer needed and prevents further running costs for these systems.
All users must access the systems via oneclick™ streaming. Only then can the number of users be correctly captured and considered for autoscaling.
6. Notes on autoscaling behavior
In addition to the configured scaling rules, the autoscaling behavior can be influenced by administrative intervention.
Manually deleting individual VMs
If a virtual machine is deleted manually, autoscaling automatically detects the deviation from the configured target state.
- The system creates a new clone VM according to the defined specifications.
- The configured initial state (e.g., number of stopped or running systems) is restored.
Execution interval
Autoscaling checks the defined metrics at an interval of about one minute.
- If defined thresholds are exceeded or undercut, the scaling decision is made in the next execution cycle.
- Therefore, a delay of up to one minute can occur between a load change and the actual system response.
Behavior when metrics are missing
If metrics (CPU, RAM, number of users) cannot be read repeatedly from a VM, the system assumes a faulty or unreachable machine.
- Autoscaling creates an additional VM to ensure the defined minimum capacity.
- The affected VM is removed automatically after a defined waiting time (approx. 30 minutes). This behavior prevents capacity bottlenecks caused by defective or unresponsive systems.
Completely disable autoscaling
Remove the assigned autoscaling event profile from the destination pool.
After removing the event profile:
- the clone VMs created automatically by autoscaling are removed according to the configuration.
- no automatic scaling takes place anymore.
- the base VM and manually added destination remain in the pool.
Operate individual systems outside of autoscaling
If a user should work independently of autoscaling on a fixed system (e.g., for nightly calculations):
- Manually clone the base VM.
- Add this VM to the destination pool.
- Assign this destination specifically to the user via the app instance.
Manually added VMs are not managed by autoscaling.
7. Notes on sticky sessions (for “Multi user” environments)
Sticky sessions ensure that users are assigned to the same destination again within a defined period. In oneclick™, this can be defined for "Multi user". This keeps existing sessions and users continue working consistently. By default, a new session is assigned with each login.
Reuse existing user sessions
- Open Resources and select Destination pools.
- Open the details view of the desired pool and click the load balancing icon.
- In the “Sticky user sessions” section, open the drop-down menu in the “Period in which existing sessions are to be used again” field and select the desired period.
The time period specified here must then also be set in Windows exactly the same. Otherwise, unexpected session behavior may occur, see Configure sticky sessions in Windows.
A maximum period of 3 hours can be selected. The higher the selected duration, the lower the effectiveness of load balancing, since users remain bound to the same destination longer. Therefore, set the value as low as possible.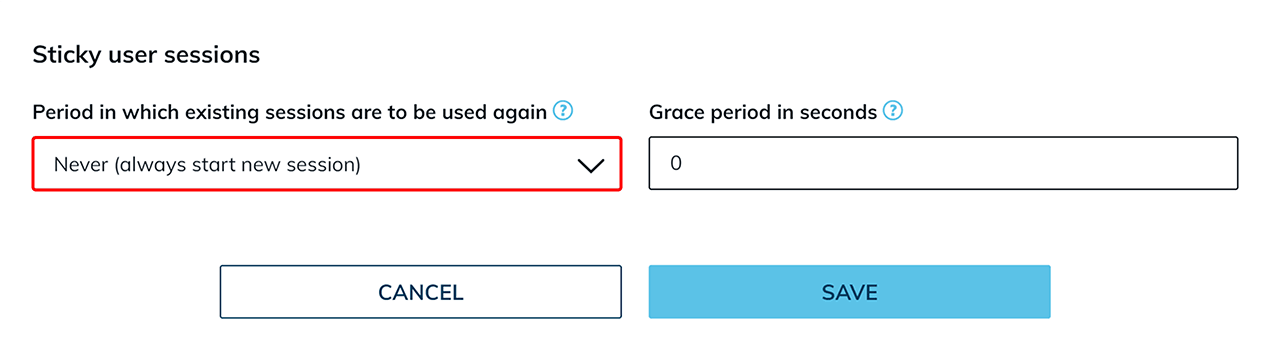
Grace period in seconds
In addition, a grace period in seconds can be defined. This time period is required especially when using roaming profiles so that user data can be written back correctly.
- Enter the desired value in the “Grace period in seconds” field and then confirm your entry by clicking Save.
The recommended length of the grace period depends on many factors and should be defined individually and adjusted after an appropriate test phase.
Especially for processes with a high volume of data, such as editing large files, a longer grace period is recommended.
If the option “Never (always start new session)” is selected in the drop-down menu, the grace period has no technical effect.

Configure reuse existing user sessions in Windows (optional)
For sticky sessions to work correctly, the time limit for disconnected sessions must also be configured accordingly in the respective Windows operating system. Ensure that the Windows settings match the period defined in oneclick™. To do so, follow the separate instructions for Setting the time limit for disconnected sessions.