Preparation & Cleanup for Updates or Sysprep
To ensure Windows runs smoothly and error-free after installing a Windows Feature Update or before performing a Sysprep operation, certain preparation and cleanup measures should be taken. After installing a Feature Update, you should first log in to the computer and restart it once before proceeding with the following cleanup tasks. Log in as a local administrator and ensure that the login is successful.
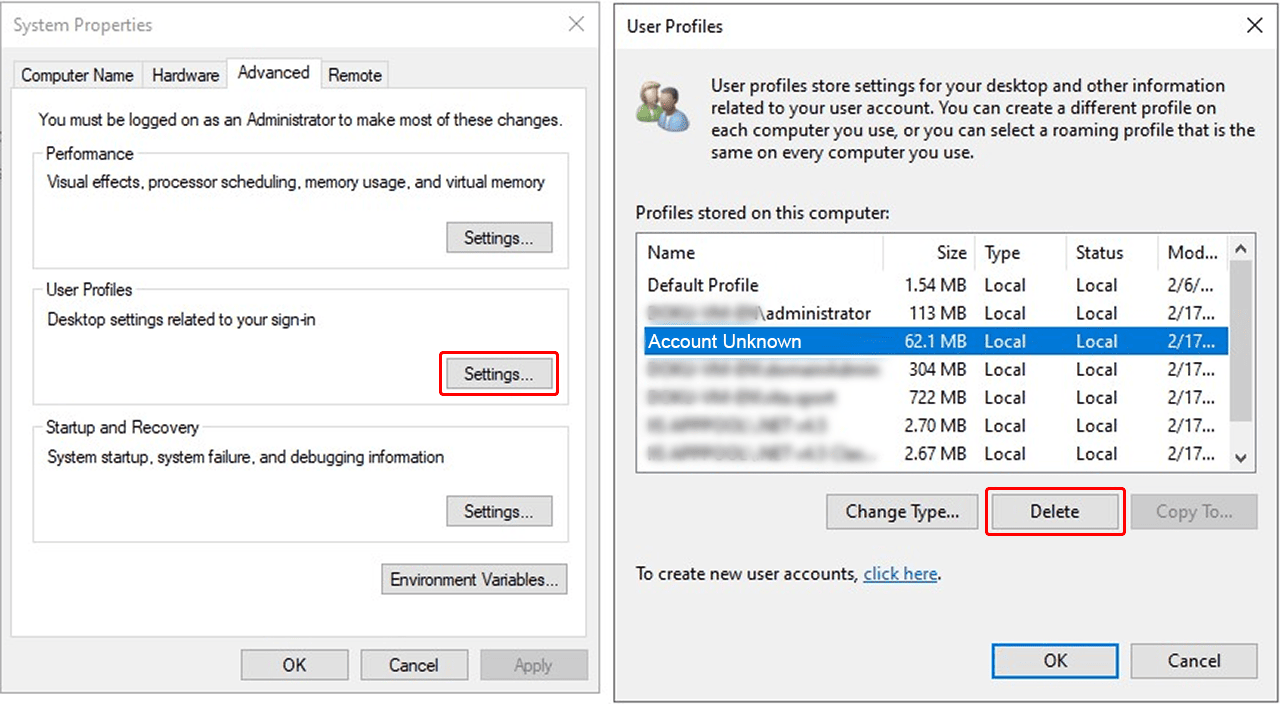
1. Removing Unknown User Accounts
- Open the Control Panel:
Control Panel → System → Advanced System Settings - Go to the "Advanced" tab and navigate to the "User Profiles" section, then click on "Settings".
- Delete all "Unknown User Accounts" (“Account Unknown”) and other unnecessary accounts, except for:
- Default profile
- The currently logged-in local administrator account
2.a Cleaning and Reinstalling AppX Packages
Please note that running the following steps may remove the Microsoft Store. As a result, preinstalled apps such as the Microsoft Calculator and other applications may no longer be available.
If you are unsure and do not want to perform a full cleanup, first carry out a manual cleanup.
Run the following PowerShell script as an administrator:
Get-AppXpackage -AllUsers | Remove-AppxPackage;

Get-AppxPackage | % {
    Add-AppxPackage -DisableDevelopmentMode -Register "$($_.InstallLocation)\AppXManifest.xml"
    };

Get-AppxPackage -AllUsers | % {
    Add-AppxPackage -Register "$($_.InstallLocation)\appxmanifest.xml" -DisableDevelopmentMode
    };
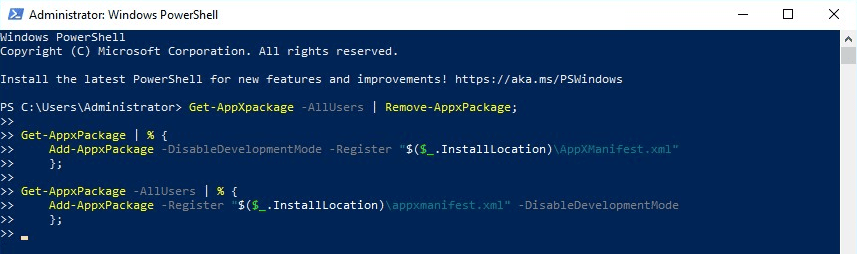 Ignore any error messages and let the script complete.
3. Disk Cleanup via PowerShell
Run the following PowerShell commands as an administrator:
Get-ItemProperty -Path 'HKLM:\SOFTWARE\Microsoft\Windows\CurrentVersion\Explorer\VolumeCaches\*' | % {
    New-ItemProperty -Path $_.PSPath -Name StateFlags0001 -Value 2 -PropertyType DWord -Force
};
Start-Process -FilePath CleanMgr.exe -ArgumentList '/sagerun:1'
This will remove temporary files and unnecessary data.
4. System Maintenance with DISM Commands
Run the following DISM.exe commands as an administrator sequentially until all are completed:
-
Open the command prompt by pressing Win + R, typing cmd, and pressing Ctrl + Shift + Enter.
-
Enter the following commands one by one and confirm each with Enter:
DISM.exe /online /Cleanup-Image /StartComponentCleanupDISM.exe /online /Cleanup-Image /SPSupersededDISM.exe /online /cleanup-image /restorehealthWait for each command to complete before proceeding.
5. Additional Checks Before Running Sysprep
If problems persist, carry out these additional steps:
-
Clean Registry Keys
Delete the following registry branch before running Sysprep to remove possible Group Policies:
HKEY_CURRENT_USER\SOFTWARE\Policies\Microsoft\Windows -
Check Group Policies
- Open the Group Policy Editor (
gpedit.msc). - Check if policies are set. If so, set them to "Not Configured".
- Restart the system and log in again before running Sysprep.
- Open the Group Policy Editor (
-
No Domain Membership During Sysprep
The computer must not be a member of a domain when running Sysprep. If necessary, remove the device from the domain and restart it.
-
Check Services
- Open
services.mscand look for services running with domain credentials. - If such services exist:
- Set them to disabled.
- Remove the associated software or delete the services using:
sc delete <service name>
- Restart the system and verify that the services have been removed before running Sysprep.
- Open
-
Check Profile Paths in the Registry
- Open the Registry Editor
regedit. - Navigate to:
HKEY_LOCAL_MACHINE\Software\Microsoft\Windows NT\CurrentVersion\ProfileList - Check if user profiles reference a drive other than
C:\Users\<Username>. If so, correct theProfileImagePathvalue for each GUID. - Restart the computer and then run Sysprep.
- Open the Registry Editor
If Sysprep still fails, the registry, domain membership, and user profiles should be thoroughly checked.
2.b Manual Cleanup for Sysprep Issues
If Sysprep does not complete successfully, manual cleanup may help identify and resolve the issue.
1. First, remove unknown user accounts
2. Run Sysprep with Administrator Privileges
- Open File Explorer and navigate to
C:\Windows\System32\Sysprep. - Right-click sysprep.exe and select "Run as administrator".
- Check "Generalize", choose "Restart", and confirm with OK.
If Sysprep still fails, proceed with the following steps.
3. Check Error Logs (Set Permissions)
Sysprep generates error logs that are not directly accessible by default.
- To gain access, navigate to
C:\Windows\System32\Sysprep\Panther\setuperr.log
If necessary, also check the setupact.log file. - Right-click setuperr.log, select "Properties", go to the "Security" tab, and click Advanced.
- Under the Permissions tab, click Add, then Select a Principal.
- Enter "Everyone", click Check Names, and then click OK.
- Grant the necessary permissions and close the window with OK. Now you can view the log errors.
4. Remove Faulty AppX Packages via PowerShell
- Open PowerShell as an administrator by pressing Win + X and selecting "Windows PowerShell (Admin)".
- Copy the faulty entries from the setuperr.log error log
- To remove a problematic AppX package, Enter:
Remove-AppxPackage -Package Paketname
- To remove the package for "All Users", Enter:
Remove-AppxPackage -AllUsers -Package Paketname
- Reopen the error log, copy further errors, and repeat the PowerShell command until all problematic packages are removed.
5. Clear Error Logs & Re-run Sysprep
- After all errors have been fixed, delete the Sysprep error logs (setuperr.log).
- Then restart Sysprep by executing
C:\Windows\System32\Sysprep\sysprep.exeausführen. - If errors occur again, repeat the steps from point 3 until the error log